9.5 KiB
Deep-Live-Cam is compatible with webcam, video or an image
One face replaced with live webcam

Two faces replaced on webcam

Also supports processing of an image or video file with one or two faces in source image

Disclaimer
This software is meant to be a productive contribution to the rapidly growing AI-generated media industry. It will help artists with tasks such as animating a custom character or using the character as a model for clothing etc.
The developers of this software are aware of its possible unethical applications and are committed to take preventative measures against them. It has a built-in check which prevents the program from working on inappropriate media including but not limited to nudity, graphic content, sensitive material such as war footage etc. We will continue to develop this project in the positive direction while adhering to law and ethics. This project may be shut down or include watermarks on the output if requested by law.
Users of this software are expected to use this software responsibly while abiding by local laws. If the face of a real person is being used, users are required to get consent from the concerned person and clearly mention that it is a deepfake when posting content online. Developers of this software will not be responsible for actions of end-users.
How do I install it?
Basic: It is more likely to work on your computer but it will also be very slow. You can follow instructions for the basic install (This usually runs via CPU)
1.Setup your platform
- python (3.10 recommended)
- pip
- git
- ffmpeg
- visual studio 2022 runtimes (windows)
2. Clone Repository
https://github.com/hacksider/Deep-Live-Cam.git
3. Download Models
Then put those 2 files on the "models" folder
4. Install dependency
We highly recommend to work with a venv to avoid issues.
pip install -r requirements.txt
For MAC OS, You have to install or upgrade python-tk package:
brew install python-tk@3.10
DONE!!! If you dont have any GPU, You should be able to run roop using python run.py command. Keep in mind that while running the program for first time, it will download some models which can take time depending on your network connection.
*Proceed if you want to use GPU Acceleration
CUDA Execution Provider (Nvidia)*
-
Install CUDA Toolkit 11.8
-
Install dependencies:
pip uninstall onnxruntime onnxruntime-gpu
pip install onnxruntime-gpu==1.16.3
- Usage in case the provider is available:
python run.py --execution-provider cuda
CoreML Execution Provider (Apple Silicon)
- Install dependencies:
pip uninstall onnxruntime onnxruntime-silicon
pip install onnxruntime-silicon==1.13.1
- Usage in case the provider is available:
python run.py --execution-provider coreml
CoreML Execution Provider (Apple Legacy)
- Install dependencies:
pip uninstall onnxruntime onnxruntime-coreml
pip install onnxruntime-coreml==1.13.1
- Usage in case the provider is available:
python run.py --execution-provider coreml
DirectML Execution Provider (Windows)
- Install dependencies:
pip uninstall onnxruntime onnxruntime-directml
pip install onnxruntime-directml==1.15.1
- Usage in case the provider is available:
python run.py --execution-provider directml
OpenVINO™ Execution Provider (Intel)
- Install dependencies:
pip uninstall onnxruntime onnxruntime-openvino
pip install onnxruntime-openvino==1.15.0
- Usage in case the provider is available:
python run.py --execution-provider openvino
How do I use it?
Note: When you run this program for the first time, it will download some models ~300MB in size.
Executing python run.py command will launch this window:

Choose a face (image with desired face) and the target image/video (image/video in which you want to replace the face) and click on Start. Open file explorer and navigate to the directory you select your output to be in. You will find a directory named <video_title> where you can see the frames being swapped in realtime. Once the processing is done, it will create the output file. That's it.
For the webcam mode
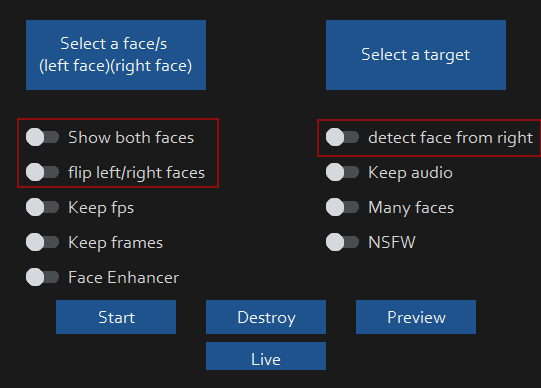
Just follow the clicks on the screenshot
- Select a face. You can select an image that has one face or two faces. Left face will be used as face one and right face will be used as face two.
- Click live
- Wait for a few seconds (it takes a longer time, usually 10 to 30 seconds before the preview shows up)
Just use your favorite screencapture to stream like OBS
Note: In case you want to change your face, just select another picture, the preview mode will then restart (so just wait a bit).
When you select an image with two faces then both faces will be replaced on webcam. Person on left will use left face and person on right will use right face from your image.
One/Two face controls for webcam mode, video or image
You can control how a face/s is replaced on target face
-
Show both faces - When you select a source image with two faces you will need to enable this option to replace both target faces on webcam, video or image. By default left face is always used. If your video has one target face or two target faces and one target face goes out of frame than left face is always used on target face.
-
Flip left/right faces - Turning on this option will flip source faces on target faces to right->left. You can flip both source faces in your webcam, video or image when two target faces are present. By default left face will replace left target face and right face will replace right target face.
-
Detect face from right - Turning on this option will replace target face detected from right of frame when two target faces are present. By default the target face/s is detected from left of webcam, video or image.
Additional command line arguments are given below. To learn out what they do, check this guide.
options:
  -h, --help                                               show this help message and exit
  -s SOURCE_PATH, --source SOURCE_PATH                     select an source image
  -t TARGET_PATH, --target TARGET_PATH                     select an target image or video
  -o OUTPUT_PATH, --output OUTPUT_PATH                     select output file or directory
  --frame-processor FRAME_PROCESSOR [FRAME_PROCESSOR ...]  frame processors (choices: face_swapper, face_enhancer, ...)
  --keep-fps                                               keep original fps
  --keep-audio                                             keep original audio
  --keep-frames                                            keep temporary frames
  --many-faces                                             process every face
  --both-faces                                             use two faces in source image
  --flip-faces                                             flip two faces in source image from right to
  --video-encoder {libx264,libx265,libvpx-vp9}             adjust output video encoder
  --video-quality [0-51]                                   adjust output video quality
  --max-memory MAX_MEMORY                                  maximum amount of RAM in GB
  --execution-provider {cpu} [{cpu} ...]                   available execution provider (choices: cpu, ...)
  --execution-threads EXECUTION_THREADS                    number of execution threads
  -v, --version                                            show program's version number and exit
Looking for a CLI mode? Using the -s/--source argument will make the run program in cli mode.
Want the Next Update Now?
If you want the latest and greatest build, or want to see some new great features, go to our experimental branch and experience what the contributors have given.
Credits
- ffmpeg: for making video related operations easy
- deepinsight: for their insightface project which provided a well-made library and models.
- havok2-htwo : for sharing the code for webcam
- GosuDRM : for uncensoring roop
- and all developers behind libraries used in this project.
- Foot Note: This is originally roop-cam, see the full history of the code here. Please be informed that the base author of the code is s0md3v